

Intro
The first blog with all technical stuff? nervousness at its peak, but still am excited to do it, I think this always happens while beginning something new, did you guys feel the same at the beginning of your "Learning in Public" phase? do let me know in the comments. I'll try to keep this session as simple, concise, & understandable as possible.
There are two ways through which you can understand the process, by creating the tool while understanding it, otherwise cloning the repo, understanding it while reading & debugging, & finally creating it again, you can choose the way you want, so, without any further do, let's dive into it...
What is a CLI Application:
A CLI or Command Line Interface application is a text-based user interface that runs on Command Prompt/Terminal-like interface and allows the user to run certain tasks and operations.
Computers are developed with these CLI with which most of the tasks of computers get handled. The interesting thing about these CLIs is that we developers can develop custom CLI apps to run the tasks we wish for using the programming language of our choice. And we are going to develop the same kind of CLI app with a basic banking structure using Node.js.
The prerequisites to develop the application are listed below,
VScode Installation.
Setting up NPM & Node.js on your system
Learning basics of Javascript with promises, & async-await functions.
Basics of file handling in Javascript
If you know all these things we're good to go, if not then just go on youtube and search for the keywords above and add " in one video" at the end, you will get the explanation in short. Okay then, are we ready? yes? cool... cause it's gonna be legen... wait for it ...dary.
Project Overview
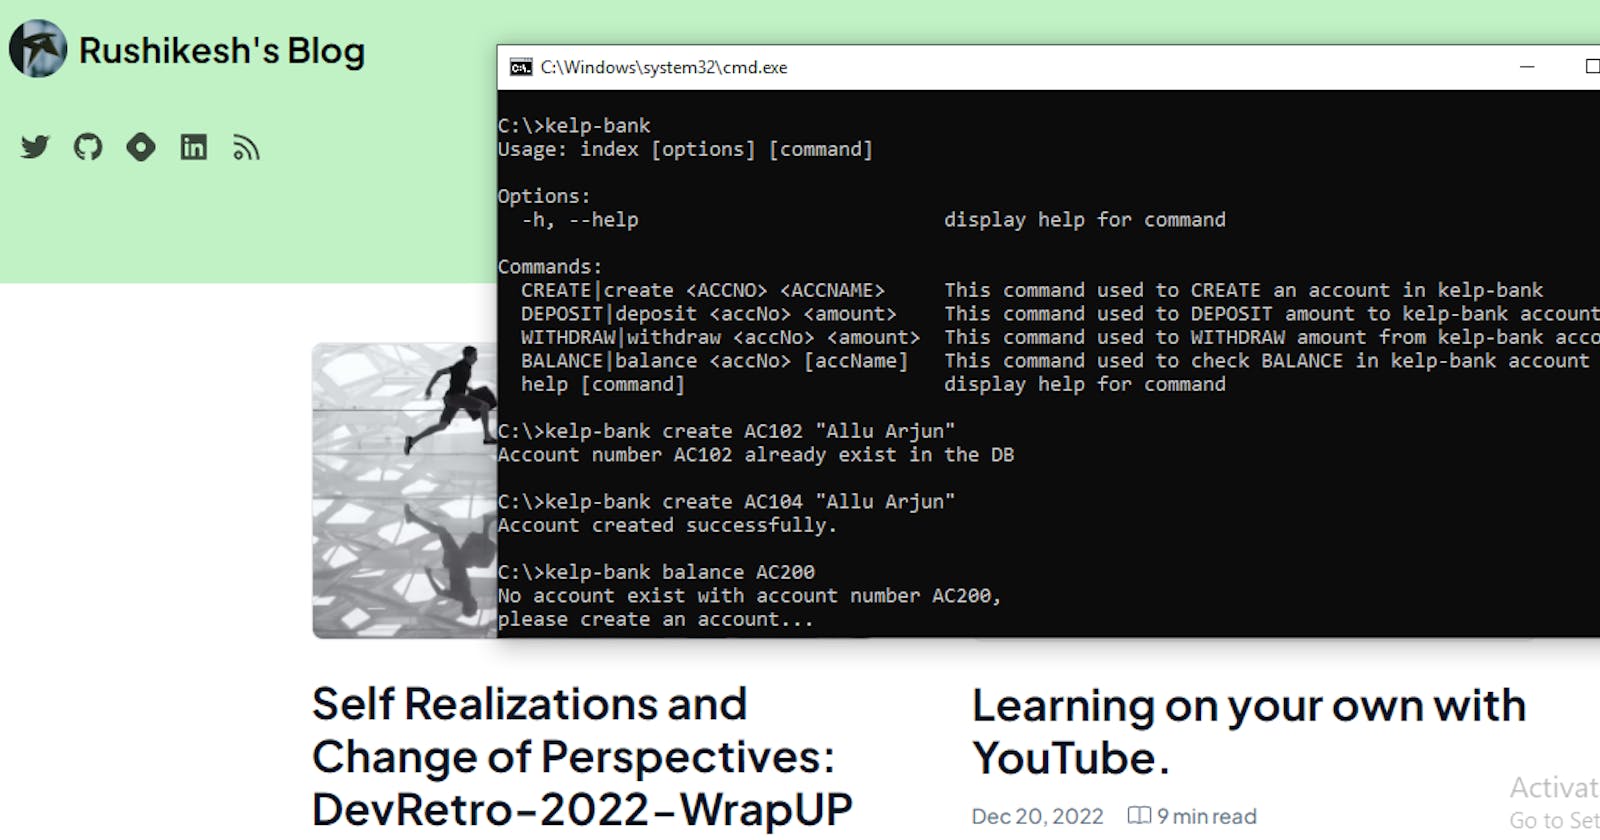
We are going to create a bank structure with a bank name kelp-bank with some commands listed below,
kelp-bank CREATE AC001 Rushikesh :
To create a zero (0) balance bank account with account no. AC001 and name Rushikesh.
kelp-bank DEPOSIT AC001 1000:
To deposit INR 1000/- in the account AC001 of kelp-bank
kelp-bank WITHDRAW AC001 1000:
To withdraw INR 1000/- from the account AC001 of kelp-bank
kelp-bank BALANCE AC001:
To check the balance available in the account AC001 of kelp-bank.
Building the CLI
Now keep in mind that the CLI I've built is on the windows platform and there are some platform-specific settings that we need to access the CLI while debugging, but once the CLI is complete, it becomes accessible irrespective of the platform. Let's create a folder/directory and name it, say "kelp-bank" as we are going to build a simple banking structure handling basic commands. After that, open that directory with VScode.
Initiating Node with package.json
Once you open the directory with VScode, open its terminal which has already gotten you into the current directly. Firstly, we will initialize npm in our directory for which use the command below and press Enter.
npm init
OR
npm init -y
It will as you some inputs like name, description, author, etc, give the necessary input and keep pressing Enter until the file gets created. we can see the file named package.json got created. All the configurations can be found in this file only. The command "npm init -y" could be used to create the default configuration.
Installing dependencies
The only dependency we will need here is the commander which is necessary to access and declare the CLI commands that we are gonna need.
Use the command below to install commander in the program:
npm i commander
You can install the dependency named "chalk" if you want to color the outputs of the CLI. This is just a design thing and does not have much relevance to the basics.
Setting up the folder structure
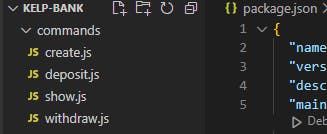
First, create files named index.js, & index.sh, index.bat, & .gitignore as shown in the image in the main directory kelp-bank

After that create a folder named commands and create files create.js, deposite.js, show.js, and withdraw.js to handle individual commands as shown in the image below,
Configuring for platform independent access
For debugging purposes instead of using the longest command like Node index.js CREATE AC001 Rushikesh, we could shorten it to ./index CREATE AC001 Rushikesh with the help of the following configuration with .bat file for windows OS and .sh file for Linux OS.
index.bat
@echo off

node index.js %1 %2 %3

#!/usr/bin/env bash

node index.js "$@"

Open the index.js folder and add the below code at the top to invoke a Node.js source file directly, as an executable in its own right, click on this page to know more. This comes in helps when we make our CLI global and try to access it with the name kelp-bank.
#! /usr/bin/env node
Setting up the starting point for the app
The starting point of our CLI is index.js so, whenever we will use the command kelp-bank the index.js should get triggered, to make that happen, add the code given below in package.json,
"bin": {
    "kelp-bank": "index.js"
  }
Declaring the CLI commands in index.js
As we're completed with all the necessary configurations, we will be using the commander for declaring commands that I've discussed in the Project Review. which we installed as a dependency earlier. So, we will import the commander inside the index.js along with it we will also import all the pages inside command folders as they will contain the functions doing operations of the commands.
const commander   = require("commander")
const create = require("./commands/create.js")
const withdraw = require("./commands/withdraw.js")
const deposit = require("./commands/deposit.js")
const show = require("./commands/show.js")

Keep in mind that the variables create, withdraw, deposit & show contain the operations needed to execute the relevant commands.
Let's understand the commander a bit,
the commander has a module named program which we will be using to declare all the commands. The command declaration is given below,
commander.program
        .command('CREATE <required> [optional]')
        .alias('create')
        .description('This creates the account')
        .action((required, optional)=>{
            console.log(`The action is taken ${required} ${optional}`)
            })
commander.program.parse()
In the above code,
.command() contains the command we want to execute, in which the first CREATE is the main command, the sub-command written inside <required> is compulsory for the user to write, and the sub-command in [optional] means it is optional for the user to add.
.alias() helps in declaring the command alternatives,
.description() helps in defining the description of the command when the user enters the --help command &
.action() is used to execute a task/operation that the command we declared should do. Also, we can access the <required> [optional] data to use it further in the execution. As we are going to need the accName and accNo entered by the user.
Also commander.program.parse() helps to parse in the command to execute.
If you want to see how this commander works, add this code in the index.js, and use the command ./index OR ./index --help & press enter, you'll get the command with its description.
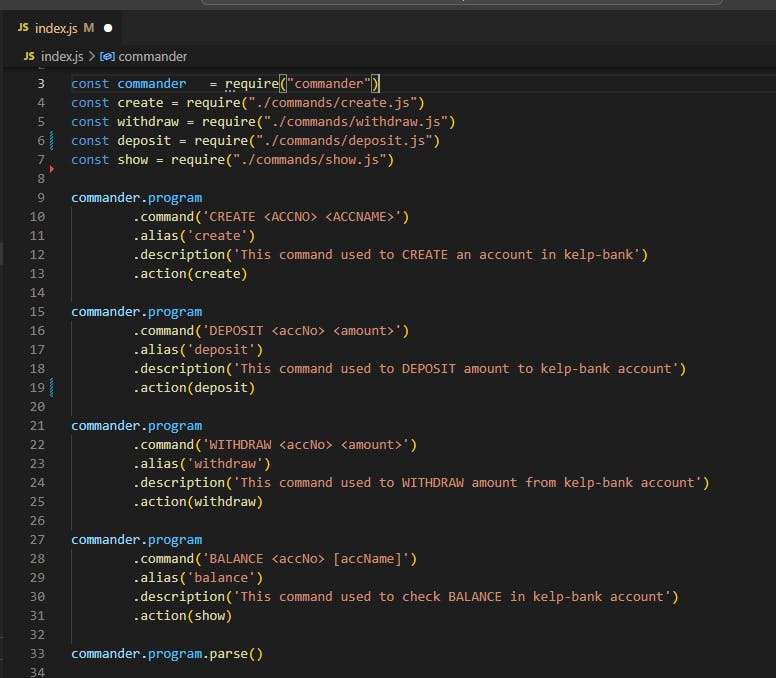
As we've understood the use of these commands, it's time to declare the commands inside the index.js as given below,
commander.program
        .command('CREATE <ACCNO> <ACCNAME>')
        .alias('create')
        .description('This command used to CREATE an account in kelp-bank')
        .action(create)

commander.program
        .command('DEPOSIT <accNo> <amount>')
        .alias('deposit')
        .description('This command used to DEPOSIT amount to kelp-bank account')
        .action(deposit)

commander.program
        .command('WITHDRAW <accNo> <amount>')
        .alias('withdraw')
        .description('This command used to WITHDRAW amount from kelp-bank account')
        .action(withdraw)

commander.program
        .command('BALANCE <accNo> [accName]')
        .alias('balance')
        .description('This command used to check BALANCE in kelp-bank account')
        .action(show)

commander.program.parse()
Remember to add commander.program.parse() in the end as it is necessary to parse in the commands to execute. Also, I've added the same command with lowercase in .alias() & therefore if the user enters the command in all upper case or all lowercase, both are acceptable.
Now out the index.js should look like the image given below,
Writing Execution Logic for Commands
In all four command pages, we will need to import some libraries like fs(file system), fs/promises & path as shown below,
const fsPromises = require('fs/promises')
const fs = require('fs')
const path = require("path")
Before focusing on the execution of commands, here's an interesting fact about the commander, we don't need to handle the conditions of the user entering wrong/incomplete commands in the terminal, as the commander handles that case himself and gives the user appropriate suggestions. You can try entering the wrong/insufficient info and see the results... it's fun.
If you've gone through the basics of file handling and promises-async-await then this is the place where that knowledge is going to be of immense help. I've still explained the concepts below in short, please try youtube of you don't understand as it's important to understand the logic coming next.
We've used only two commands of file handling we've used, fspromises.readFile(filePath) => to read the data from file fspromises.writeFile(filePath, dataToStore, 'utf8') => to replace the data with dataToStore if the file exists already OR to create a file with data dataToStore if the file doesn't exist.
To check if the file exists in the directory, we use fs.existsSync(filePath) which returns a boolean value. Also, path.join(__dirname, filename.json) is used to set the path of the file w.r.t. where the directory is stored.
Handling CREATE Command in create.js:
Firstly, we will create an asynchronous function named create in create.js & import the dependencies and export the function right away,
 const fsPromises = require('fs/promises')
 const fs = require('fs')
 const path = require("path")

 const create = async  (accNo, accName)=>{

 }

 modules.export = create
Now the code for CREATE command will be written in the create function only, We will create the account of the user in the form of a list of objects like to the file named bankdb.json,
 [
     {
         "accNo": "AC100",
         "name": "Rushikesh",
         "balance": 0
     },
     {
         "accNo": "AC101",
         "name": "Shubham Sinha",
         "balance": 0
     }
 ]
for which we will create a list named accdetails & an object named newAccount inside the create function of our create.js file as shown,
 var accDetails = [];
     const newAccount = {
         accNo: accNo,
         name: accName,
         balance: 0
     }
In the CREATE command, we will receive the account number and account name from the user, & as we're aware of the banking structure, we can't have two accounts in a bank with the same account number. So we need to check the bankdb file storing data to if there exists any user data with the same account number. But, for the very first create command, there won't be any existing bankdb file, so there comes another condition if there exists any file to check data in it. Handling this case won't give us any errors while reading data. Keeping these conditions in mind, I've written the code for creating the user account.
     var accExist = false; /*variable to check if the account exist in bankdb.json file */
 // check if DB file exist
     if (fs.existsSync(path.join(__dirname, 'bankdb.json'))){
         // Reading the data from bankdb.json and storing it in accDetails variable
         accDetails = JSON.parse(await fsPromises.readFile(path.join( __dirname,'bankdb.json')))
 //Traversing in the list of all user
         for (var i = 0; i < accDetails.length; i++){
 //check if account exist in bankdb already
             if (accDetails[i].accNo == accNo) {
                 accExist = true;
                 console.log(`Account number ${accNo} already exist in the DB`)
                 break;
             }
         }
     }

 //  If account doesn't exist in the db then only create the account of user
     if (!accExist){
         accDetails.push(newAccount)
         // replacing the whole data of bankdb.json file with already read accDetails with appeding newAccount data init
         await fsPromises.writeFile(path.join( __dirname,'bankdb.json'), JSON.stringify(accDetails), 'utf8')
         .then(()=>{
             console.log('Account created successfully.')
         })
         .catch((error)=>{
             console.error(error.message)
         })
     }
 }
Finally, the create.js should look alike the image added below,

Handling DEPOSIT Command in deposit.js:
Along with the deposit command, we get the account number & amount to be deposited from the user. The condition we have to handle here is, if the user tries to deposit to a non-existing account and if there exists bankdb.json. Along with handling these conditions, the code for writing in deposit.js is given below,
 const fsPromises = require('fs/promises')
 const fs = require('fs')
 const path = require("path")

 const deposit = async (accNo, amount) => {
     var accExist = false
     if (fs.existsSync(path.join(__dirname, 'bankdb.json'))) {
         var accDetails = JSON.parse(await fsPromises.readFile(path.join(__dirname, 'bankdb.json')))
         for (var i = 0; i < accDetails.length; i++) {
             if (accDetails[i].accNo == accNo) {
                 accDetails[i].balance += (Number)(amount)
                 await fsPromises.writeFile(path.join(__dirname, 'bankdb.json'), JSON.stringify(accDetails), 'utf8')
                     .then(() => {
                         console.log(`Successfully deposited the amount on acc no. ${accNo}`)
                     })
                     .catch((error) => {
                         console.error(error.message)
                     })
                 accExist = true;
                 break;
             }
         }
         if (!accExist) console.log(`No account exist with account number ${accNo}, \nplease create an account...`)
     } else {
         console.log(`No account exist with account number ${accNo}, \nplease create an account...`)
     }
 }
 module.exports = deposit
Handling WITHDRAW Command in withdraw.js:
Along with the withdraw command, we get the account number & amount to be withdrawn from the user. The condition we have to handle here is, if the user tries to withdraw from a non-existing account and if there exists bankdb.json Along with handling these conditions, the code for writing in withdraw.js is given below,
 const fsPromises = require('fs/promises')
 const fs = require('fs')
 const path = require("path")

 const withdraw = async (accNo, amount) => {
     var accExist = false
     if (fs.existsSync(path.join(__dirname, 'bankdb.json'))){
         var accDetails = JSON.parse(await fsPromises.readFile(path.join( __dirname,'bankdb.json')))
         for (var i = 0; i < accDetails.length; i++){
             if (accDetails[i].accNo == accNo && accDetails[i].balance >= amount) {
                 accDetails[i].balance -= (Number)(amount)
                 await fsPromises.writeFile(path.join(__dirname, 'bankdb.json'), JSON.stringify(accDetails), 'utf8')
                     // .then(() => {
                     //     console.log(`Transaction Successful\n acc no. ${accNo}\n current bal. ${accDetails[i].balance}`)
                     // })
                     .catch((error) => {
                         console.error(error.message)
                     })
                 accExist = true;
                 break;
             }else if (accDetails[i].accNo == accNo && accDetails[i].balance < amount){
                 console.log(`Bank balance below ${amount}, please enter less amount`)
             }
         }
         if (!accExist) console.log(`No account exist with account number ${accNo},\n please create an account...`)

     }else{
         console.log(`No account exist with account number ${accNo},\n please create an account...`)
     }
 }

 module.exports = withdraw
Handling BALANCE Command in show.js:
Along with the balance command, we get the account number (required) & account name (Optional) to be withdrawn from the user. The condition we have to handle here is, if the user tries to check the balance from a non-existing account and if there exists bankdb.json Along with handling these conditions, the code for writing in show.js is given below,
 const fsPromises = require('fs/promises')
 const fs = require('fs')
 const path = require("path")

 const show = async (accNo) => {
     var accExist = false
     if (fs.existsSync(path.join(__dirname, 'bankdb.json'))){
         var accDetails = JSON.parse(await fsPromises.readFile(path.join( __dirname,'bankdb.json')))
         for (var i = 0; i < accDetails.length; i++){
             if (accDetails[i].accNo == accNo) {
                 console.log(`${accDetails[i].name} ${accDetails[i].balance}`)
                 accExist = true;
             }
         }
         if (!accExist) console.log(`No account exist with account number ${accNo}, \nplease create an account...`)
     }else{
         console.log(`No account exist with account number ${accNo}, \nplease create an account...`)
     }
 }

 module.exports = show
Making the CLI Application Global
Hurray! As we've reached this part, that means we're just a step away from using the commands we've declared earlier to use globally in the system. After making this app global on your system, you could access the application anywhere from the terminal, isn't that magical?
If you've followed all the steps carefully & not made any mistakes till now then we are good to go, but before that just cross-check that you've added #! /usr/bin/env node at the top of index.js file & the below code inside package.json
"bin": {
    "kelp-bank": "index.js"
  }
Are we ready? Yes, then just open the terminal of VScode and run the command given below to let the magic happen,
npm i -g
Once this process completes, opening the terminal in any directory doesn't matter, you can run all four commands & the CLI application will show you the appropriate results.
So, finally, your CLI Banking Application is ready to use... Now go and try the commands and check the output as well as how data gets saved in bankdb.json which you will find in the commands folder.
Are we done here? Well, not yet my friend, the thing is we've just made the CLI global on our device only but there's a way with which we can make our CLI available on NPM as a package... I'll cover that part in some other blog as this blog has become quite huge.
GitHub Repo Link
If you find any difficulty with the code base, visit my GitHub repo by clicking here.
Outro
So, hello all! I am Rushikesh & this is a blog on developing CLI Applications, will meet again with an exciting tech blog, with necessary improvements... till then it's a farewell.